Featured Posts
Monday, December 12, 2011
Thursday, November 10, 2011
How to make 3D Wheel and Rim in 3D Max
This tutorial is based on Wheel and rim making that how to make wheel in 3D Max. This tutorial explains the 3D model processing of Wheel in very detailed approach. This modeling is not difficult we are making this with very basic and common techniques. Hopefully you will like this and learn from this.
Wednesday, November 9, 2011
Creating a Colorful Business Card in Photoshop
Every Designer definitely needs a Business Card or Information card of some sort, even if it’s just a piece of paper with your name and number on, ok well not just a piece of paper. A designer has to brand him/her self with uniqueness to catch a clients eye.
I have written a tutorial that is really simple to follow to create yourself a really colorful and vibrant business Card.
FINAL PREVIEW

Information about the cards:
Bleed Lines: 3mm and 1.5mm
Color Palette: PANTONE CMYK EC
Size: 90mm x 50mm at 300dpi – 1063px x 591px – 300dpi
Step 1:
Fill your background layer with any dark color, I used a Dark Grey(#1c1b1c) to Soft Grey(#343434) Radial Gradient, but you can seriously fill the background with any dark color. You should have something like this below.
Step 2:
Now that you have a background to work on, we will be moving on to the more time consuming steps, the Circles. Create a New layer(Shortcut: Ctrl + Shift + N) or (Layer>New>Layer) go to your toolbar and select your Ellipse Tool(Either press U or go to your Rectangle Tool and Click and hold down the mouse button till a little menu appears and select your ellipse tool.) Next we will be making 3 different sizes of circles, so first draw a Circle on your canvas; hold down Shift to make sure the circle is symmetric. Make sure you have a decent size circle for your first one; the first one is the largest circle of them all. Choose the color you want for your main circle, I chose white and for some I chose pink, it can be any color you want though.
Step 3:
Now that you have your big circle do the exact same thing as you did in Step 2 but, just make the circle a little bit smaller than the previous one, be sure to select the color that you want for that circle too. When you are done with creating your medium sized circle repeat Step 2 again and create yourself a small circle, choose the color that you want as well. You should have something like this below.
Step 4:
Now you have your circles that you can work with, here comes the lengthy part in the entire process. Choose a circle and select its layer, duplicate that layer and stack the circle with another color, now do the same with your other size circles as well. You Duplicate the Layer by hitting(Ctrl + J) or (Right Click on the layer and click Duplicate). Like I said this does take a while so be patient. Play around with the layers, changing their placing and visibility etc, Stacking the circles does take quite a while, Once you have proceeded to stacking quite a few circles, I would recommend adding some depth to them, so right click on one of your layers and click Blending Options. Choose Drop Shadow and Use the settings I have displayed below.Without Drop Shadow:

Drop Shadow Settings:

With Drop Shadow:

Step 5:
Now that you have a nice stacking of circles, I want you to group all the circle layers. Create a new group by going to Layer>New>Group – you will see a folder appear in your layers tab now select all your circle layers and drag them into your new group. This helps to organize your different layers, especially if you are working with a big quantity of layers. Once you have grouped your circles, Right Click on the group folder and click Duplicate Group, now you have a duplicate of all those stacked circles, so now you move that around and rotate it or bend it, to fit to your scene, repeat that step a few times by duplicating the group and then moving it around to fill up your entire work space. This Is the outcome I got after Step 5. You don’t have to worry about the guide lines, just make sure everything inside of the guidelines are filled.

Step 6:
Time to work on the back of our Business Card. Go to File>Save As and save your file in a folder of your choice (Make sure you save it as a .psd). Now hide all your previous layers that you have created except the background. Go to Layer>New Fill Layer>Pattern – Name your pattern and hit OK – you will see that the background is suddenly covered in a pattern. Follow the Diagram I have below to find the Correct Pattern that I used for this Business Card called (Stone, it is a 80x80px repetitive pattern) You can hover over the texture to see its name. When you have found the Texture you just hit OK.

Step 7:
In this step we will be doing two things, we will be adding a Gradient Map and the Text. Select your top layer and go up to Layer>New Adjustment Layer>Gradient Map – The default should be Black to White, or White to Black. Make sure that your Gradient map Is Black to White and hit OK. Go to you Blending Options and set the Layers Blending Mode to Multiply. This will increase the contrast and decrease the Brightness. Now grab your Text tool or just hit ( T ) Click on the canvas, I selected the font Square721 BT with a size of 28pt(Points) and used this for the Name. Next I used Arial with a size of 11pt(Points) for the Job (Freelance Designer) I lowered the opacity of the layer down to 50% and lastly I used RNS Serial with a size of 7pt(points) for the Description(design.print.web) I also lowered the opacity of the layer down to 15%
Step 8:
In this step I used two of the groups of stacked circles, I made two of the groups visible and positioned them on the sides of the business card, so that they support the flow of the overall card, It gives you the feeling that the front Business Card’s circles wraps around the card and ends up at the back.
FINAL:
source:http://creativeoverflow.net
Monday, October 10, 2011
Blueprint Style Text in Adobe Illustrator
1 START WITH THE TEXT
Begin by setting your text. Select the Type tool (T) in the Toolbox and click on the artboard to set a text object. In the Control panel, set the font to Arial Black and the text size to 285 pt. Enter one or two lines of text using any word(s) you like. We have simply typed in “HOUSE WORKS” on two lines. We also typed four spaces before “WORKS” and tightened up the tracking by selecting all the text with the Type tool and pressing Option-Left Arrow (PC: Alt-Left Arrow) a few times.

2 ADD STROKE; FILL WITH WHITE
Select all the text with the Selection tool (V). Near the bottom of the Toolbox, click on the Stroke option to make it active. Go under the Window menu and choose Swatches to open the Swatches panel. Then select the blue swatch in the Swatches panel, as shown here, to set the stroke color. Set the Stroke size to 5 pt in the Control panel. Now simply set the Fill color to white.

3 COPY TEXT; SWAP FILL AND STROKE
Copy this text to the clipboard by going under the Edit menu and choosing Copy. Then, go under the Edit menu again and choose Paste in Front. This will paste the copy directly over the original, so you won’t see any change. (Trust us, it’s there.) Then, swap the Fill and Stroke colors by clicking the bent double-headed arrow next to the Fill and Stroke color swatches in the Toolbox. Set the Stroke to None. All you should have is a blue fill and no stroke. Keep this object selected.

4 APPLY SCRIBBLE EFFECT
With this object still selected, go into the Effect menu, under Stylize (in the Illustrator Effects section), and choose Scribble. This is one really involved effect. At this point, you can either use the settings shown here or you can experiment to see the different results you can get. Keep an open mind—you may discover a really cool effect. Click OK when you’re done.

5 DRAW BLUE LINE ABOVE TEXT
Next, select the Pen tool (P) in the Toolbox and click a point just above and to the left of the text. Hold the Shift key and click a second point to the right of the text. Set the Stroke color to the same blue color we used for the text. Then in the Control panel, set the Stroke size to 7 pt. Lastly, select the line and position it right along the top edge of the top line of text.
Note: If you can’t see the stroke, make sure the Scribble effect isn’t applied to it in the Appearance panel.

6 COPY BLUE LINE THREE TIMES
Press Command-C (PC: Ctrl-C) to copy this line, and then press Command-V (PC: Ctrl-V) three times to paste it three times. Drag a copy to the bottom of the first line of text and then drag copies to the top and bottom of the next line of text (as shown here). This will give us the baselines illustrating the straightness of the letters. Offset the lines from each other so it doesn’t look too symmetrical.

7 ADD ADDITIONIONAL LINES AND ARROW SYMBOL
Use the Pen tool to create similar blue lines along the sides of some of the letters to enhance the blueprint effect (set the Stroke to 5 points to match the stroke on the letters). Open the Symbols panel under the Window menu. In the panel’s flyout menu, go to Open Symbol Library>Arrows. Drag-and-drop the third arrow onto the artboard. With it still selected, go into the Control panel and click the Break Link button. In the Object menu, select Expand Appearance. This will turn the Symbol into a regular object. Set the Fill to the same blue we’ve been using and resize as necessary.

8 ADD ARROWS, DOTTED LINES, AND NUMBERS
Arbitrarily place arrows on the lines that you drew in Step 7. Just copy-and-paste numerous copies of the arrow and drag them into place. Use the Selection tool to vary the size and rotate them as necessary. Now add some small, meaningless numbers around the text to give the idea of measurements. Then add some simple, dotted lines using the settings in the Stroke panel, as shown here. We also used the Pen tool to draw an additional element to our original arrow.

9 CREATE BLUE BOX AND MASK WITH BLACK BOX
Select the Rectangle tool in the Toolbox and draw a box over the entire graphic. Set the Fill color of this box to—you guessed it—blue. Now draw another box right over this blue one that’s slightly inset and set the Fill color of this box to black (make sure the fill is R:0, G:0, B:0 or C:0, M:0, Y:0, K:100). So you should have a black box on top of a slightly larger blue box. Select both boxes and open the Transparency panel under the Window menu. In the panel’s flyout menu, choose Make Opacity Mask. The black box will mask away the blue box.

10 ADD GRADIENT MESH TO MASK
We need to do a little more work on the mask, so make sure that the mask thumbnail is highlighted in the Transparency panel (indicated by a thick, black line). Select the mask shape and go under the Object menu and select Create Gradient Mesh. Enter 6 for Rows and 6 for Columns. Set the Appearance to Flat and Highlight to 0%. Click OK. (Did you know that you could have a gradient mesh mask?)

11 CHANGE POINTS ON THE GRID TO WHITE OR GRAY
Using the Direct Selection tool (A), select various points of the mesh and set their colors to white or any varying shade of gray to allow all or some of the blue to come through. The mask works similar to that of a layer mask in Photoshop where black will completely mask a shape, white reveals everything, and gray will show some transparency. The goal here is to give the effect of the blue powder on a blueprint. Note: Make sure the Fill is active in the Toolbox.

12 ADD TEXTURE
The last thing is the texture. Use the Rectangle tool to draw another box approximately the same size as the mesh (make sure you’re back in art mode and not mask mode in the Transparency panel). Set the Fill color to an off-white like this one shown in the Swatches panel. Go under the Effect menu, under Photoshop Effects, and choose Texture>Texturizer. Set the Texture to Sandstone, the Scaling to 100%, and the Relief to 3. For the Light direction, choose Top Right. Click OK. Then go under the Object menu, under Arrange, and choose Send to Back. This will finish the effect of blueprint paper.

Final Image

Thursday, September 29, 2011
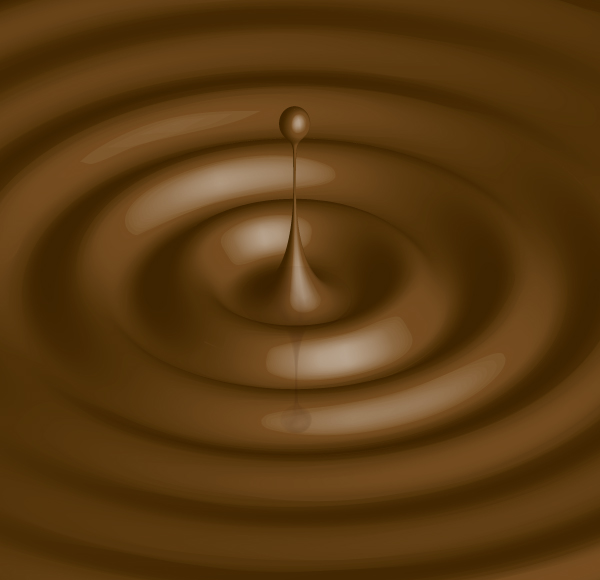
How to Create a Caramel Ripple Effect in Illustrator
Final Result
Step 1
Create a new document of approximately 600px by 580px size. Next, with the Line Segment Tool (backslash), draw a line of 600px length and stroke it with CMYK values: C=40, M=65, Y=100, and K=35.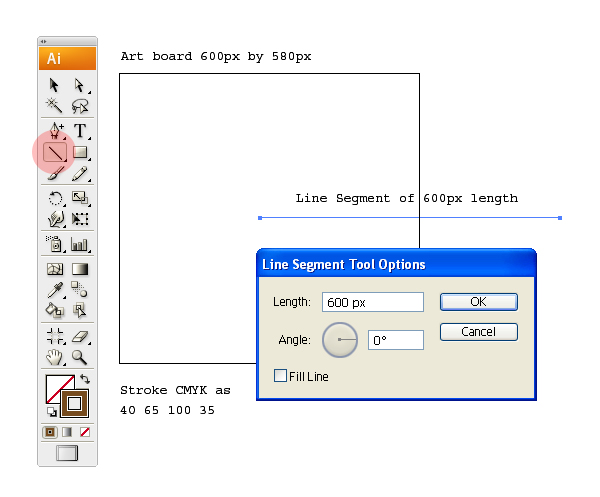
Step 2
Select the line and go to Effect > Distort & Transform > Zig Zag. Enter the values as shown in red below. This will make a wave like effect as seen in liquids.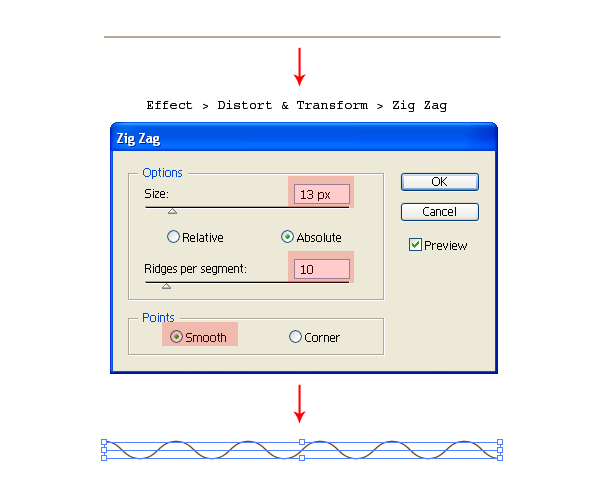
Step 3
The waves generated in a liquid vanish as they move outwards. For this, we will use some distortion. Select the line and go to Object > Envelope Distort > Make with Warp (Alt + Shift + Command + W). In the Warp Options, select the Fish effect with 50% bend. This will make the desired wave with vanishing ends.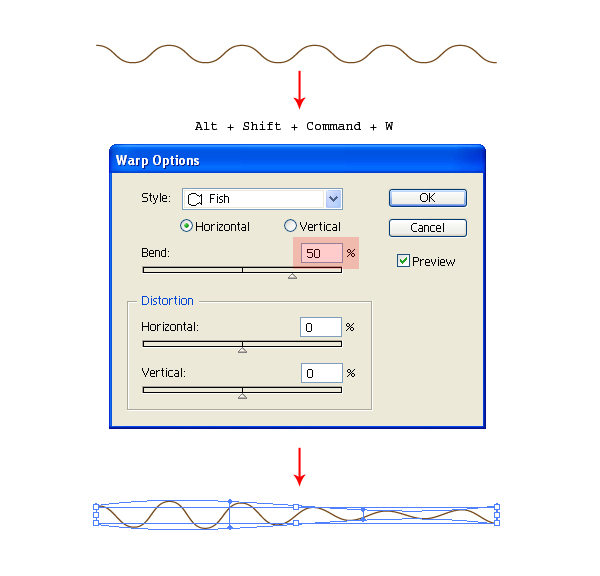
Step 4
Select the wave and expand it using Object > Expand.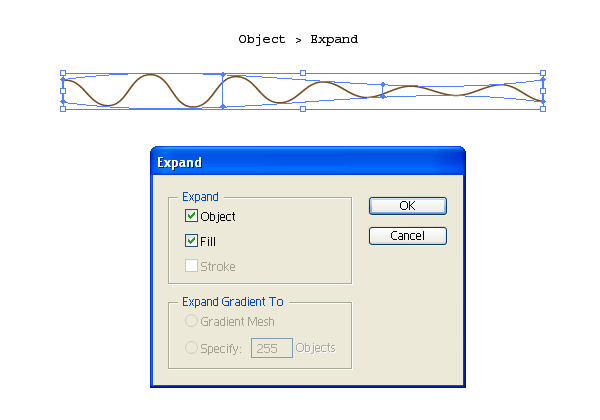
Step 5
Next, we will add a drop bounce effect. With the Direct Selection Tool (A), select the first anchor and drag it upward. With the Add Anchor Point Tool (+), add a couple of anchor points and adjust the handles to get the result shown below. You will see a King Cobra like anatomy. Keep a backup copy of this figure as we will use it later for the reflection.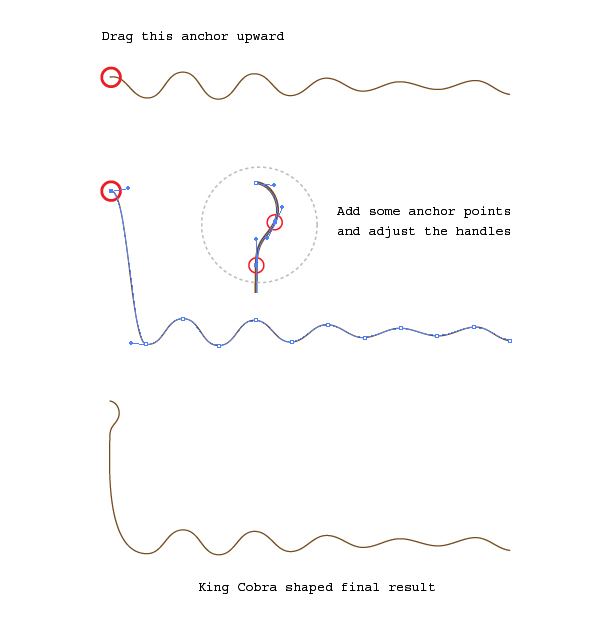
Step 6
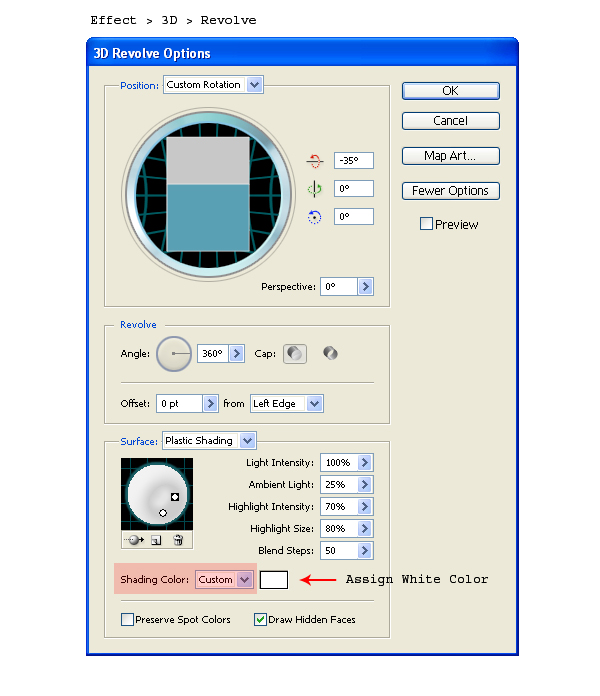
The base for our caramel effect is ready. Next, select the figure and go to Effect > 3D > Revolve. Click on More Options and enter the values as shown in the red regions below.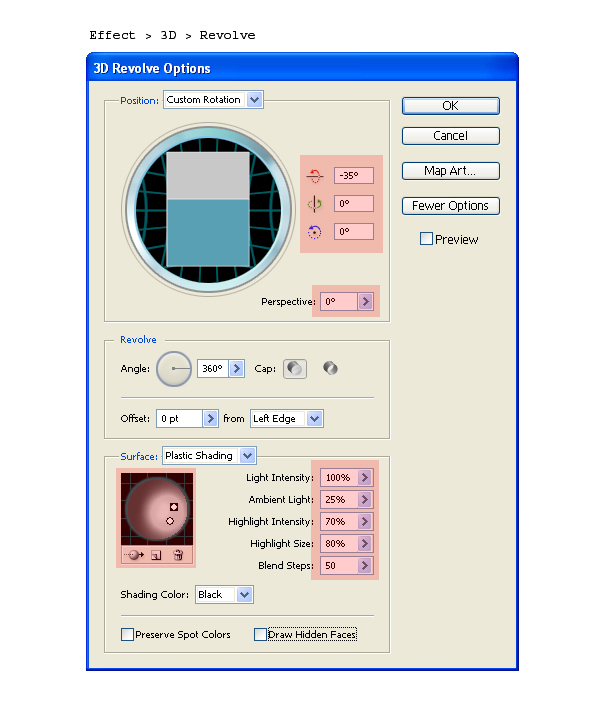
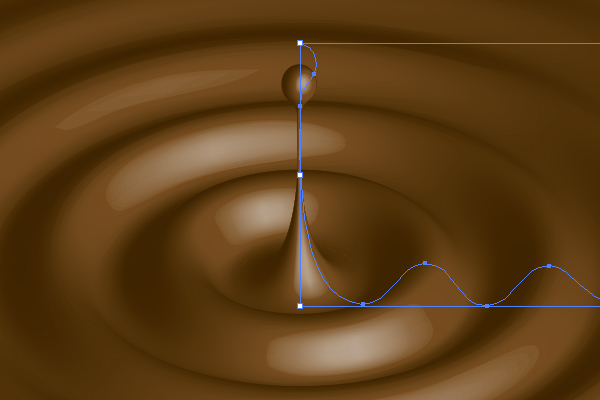
Step 7
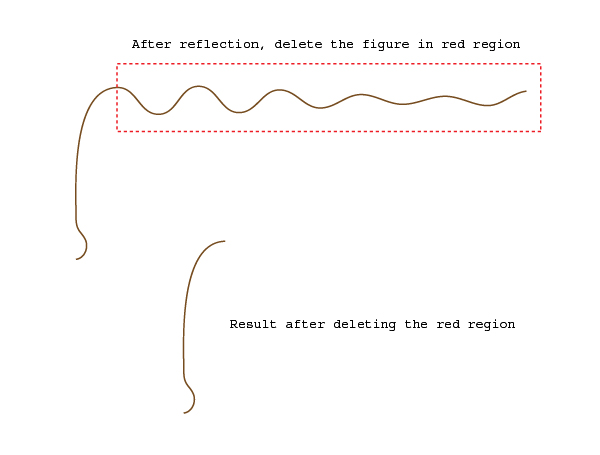
Now we will add some reflection to the bouncing drop. Grab the backup copy of Step 5 and reflect it horizontally using Object > Transform > Reflect. Next, delete the region shown in red using the Direct Selection Tool (A).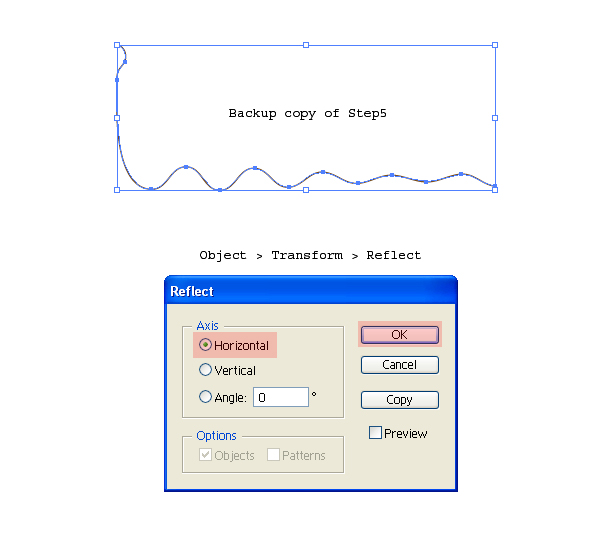
Step 8
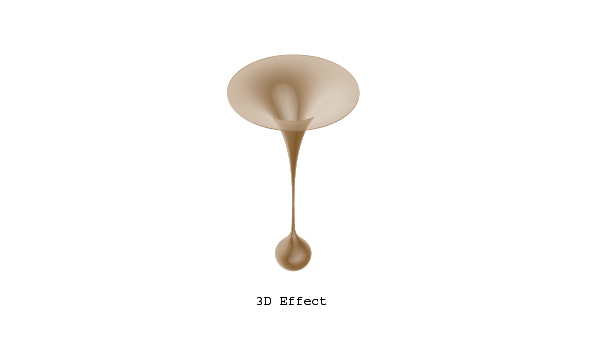
Select the reflected figure and go to Effect > 3D > Revolve. Enter the same values as in Step 6. Change the Shading Color to Custom and assign a white shadow.
Step 9
Position the shadow graphic in line with the bouncing drop. Next, adjust its Transparency to 20% and reduce its height to match with the perspective of the overall graphic.

Conclusion and Scope
The techniques covered in this tutorial are an effective use of built in Illustrator Tools. The Zig Zag, Warp and the Revolve Tool yields the ripple effect in less time and effort.Below is a water ripple effect that I have created using the same technique. A mixed use of distort and warp options often yields creative results. We just need to experiment with them. I hope you enjoyed this quick and easy tutorial.

Source: Vector.tuts+
Monday, September 26, 2011
How to Make Tooth Paste in 3D Max
Tools used:
Standard Primitives, Polygon Modeling, Loft.
Step 1:
Create cylinder from standard primitives with following parameters.

Step 2:
Convert this object to poly.

Step 3:
Select the vertices and adjust
the shape.


Step 4:
Select the following face with Polygon and apply bevel.

Step 5:
Use bevel and inset .
Step 6:
Select the following face of theobject and apply extrude.

Step 7:
Turn on swift loop for add segments.
Step 8:
Add segments to tighten the edges of the objects.

Step 9:
Turn on the nurms for meshsmooth.
Step 10:
Shape up the following vertices.

Step 11:
- Press (M) key for material editor.
- Change the following Parameters.
- Drag and drop the material on the Object.

Step 12:
Change the second material.
Step 13:
Scroll down the 2nd material slot and apply Image based reflection .
Use this image:

Step 14:
- Select the object go to the modify
for polygon. - Turn on polygon and select
- Following faces of the object.
- Drag n drop the material on the
selected faces.

Step 15:
Select another material slot for Graphics.
Graphics used:

Step 16:
- Select these faces
- Turn on the (show standard
map in viewport) button. To
view the map in the viewport. - Drag n drop the material.

Step 17:
- Adjustment of graphic map
- While selecting the following
faces go the modifier list. - Apply uvw map for adjustment.

Step 18:
Try to adjust the map by movinggizmo and following parameters.

Step 19:
After adjustment of graphic map of select object’s faces withuvw map.

Step 20:
Create line for paste.
Step 21:
Draw line from left view.
Step 22:
- Go to the top view port.
- Select the line and go to the
modify panel. - Turn on the vertex and adjust the
line.

Step 23:
Create circle from the shape.
Step 24:
Select the line and open thecompound object panel.

Step 25:
Click on the get shape button then select the circle.
Step 26:
- Select the loft object.
- Go to the modify panel.
- Open deformations and click
on the scale. - Scale deformation window will
appears. - Click on the Bezier point to insert
the points on the scale line.

Step 27:
Insert points and adjust the following scale line.
Step 28:
Create cylinder with following parameters for cap.
Step 29:
- Convert this object to poly.
- Select the following face and hit delete.

Step 30:
Select the following faces .
Step 31:
Extrude the following faces.
Step 32:
- Go to the modifier list and apply
shell for wall thickness. - Adjust the following parameters

Step 33:
- Go to the modifier list again and apply taper .
- Adjust the following parameters.

Step 34:
- Open material editor again and create following material for paste and cap.
- Apply white material on the cap.
- Blue on trhe paste.

Step 35:
- Create plane for ground base.
- Create and apply following material
on the plane.

Step 36:
Go to the standard lights and create sky light with following parameters.
Step 37:
Finally render the scene using (F9)key.

Final Result:

Subscribe to:
Posts (Atom)


